Vision Hawk
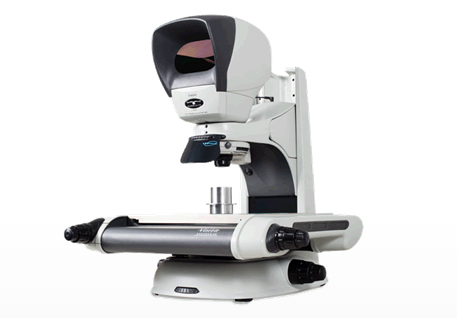
HAWK ELITE For precision non-contact measurement and inspection of 3D parts. Employing patented Dynascope™ optical technology, Hawk Elite provides high accuracy measurement of precision components, so you can have complete confidance in your results. The Hawk Elite non-contact optical measurement system has been designed for companies who demand the highest levels of manufacturing quality. Hawk Elite offers high accuracy, repeatable measurement of complex components of all materials and excels at measuring difficult-to-view samples, such as black or transparent plastics. Hawk Elite offers a powerful, flexible solution to meet the most demanding measuring requirements.

Features
High accuracy and repeatability, 3-axis non-contact measurements
Microscope-resolution optical image provides high accuracy measurement
Patented optical viewing head clearly defines edges, offering superb resolution and contrast
High precision measuring stage options
Powerful and intuitive PC-based software or simple to operate data processor
Wide range of system configurations and options, including fully automated CNC control
Optics Patented twin pupil monoscopic Dynascope™ infinity corrected optical system, with pre-centred crossline graticule to both eyes
Magnification Options (System Total) Choice of both macro or micro objectives. Single macro objectives include an iris to adjust field of view to promote clarity of edges. Micro objectives housed in a 4-turret array.
Macro Objective Lenses
|
Objective lens |
Total Magnification |
Working distance |
Field of view (mm Ø) |
Depth of Field |
|
1x |
10x |
84mm |
14.2mm |
270µm |
|
2x |
20x |
81mm |
7.1mm |
67µm |
|
5x |
50x |
61mm |
2.8mm |
10µm |
|
10x |
100x |
32mm |
1.4mm |
6µm |
Micro Objective Lenses (Standard Working Distance)
|
Objective lens |
Total Magnification |
Working Distance |
Field of View (mm Ø) |
Depth of Field |
|
5x |
50x |
20mm |
4.4mm |
12.22µm |
|
10x |
100x |
10.1mm |
2.2mm |
3.06µm |
|
20x |
200x |
3.1mm |
1.1mm |
1.3µm |
|
50x |
500x |
0.66mm |
0.44mm |
0.43µm |
Micro Objective Lenses (Long Working Distances)
|
Objective lens |
Total Magnification |
Working Distance |
Field of View (mm Ø) |
Depth of View |
|
10x |
100x |
21mm |
2.2mm |
4.4µm |
|
20x |
200x |
12mm |
1.1mm |
1.72µm |
|
50x |
500x |
10.6mm |
0.44mm |
1.10µm |
|
100x |
1000x |
3.4mm |
0.22mm |
0.43µm |
Micro Objective Lenses (Super Long Working Distances)
|
Objective Lens |
Total Magnification |
Working Distance |
Field of View (mm Ø) |
Depth of Field |
|
20x |
200x |
21mm |
1.1mm |
2.24µm |
|
50x |
500x |
15mm |
0.44mm |
1.36µm |
Software ND 1200 rugged microprocessor M3 metrology software IK 5300 metrology software
Accessories Substage colour filter (to enhance definition of profiled or tuned parts)
Measuring Stage
|
Measuring range (X,Y) |
150mm x 150mm |
|
Measuring range (Z) |
195mm (244mm max.)* |
|
Measurement Accuracy |
U952D = 4+(5.5L/1000)µm |
|
Stage Repeatability (X) (Y) (Z) |
0.004mm, 0.004mm, 0.004mm** |
|
Encoder Resoultion (X) (Y) (Z) |
0.001mm, 0.001mm, 0.0005mm |
Automation
|
Stage movement |
Manual |
Illumination Options
|
Surface Illumination |
Bright white, controllable and programmable quadrant LED ringlight |
|
Episcopic Illumination |
Controllable and programmable LED Episcopic illumination. Projects light through the lens (TTL). Micro objectives require Episcopic illumination. |
|
Substage Illumination |
Controllable and programmable LED substage illumination. Includes iris adjustment to provide clearly defined edges. |
Dimensions
|
W x D x H |
540mm x 700mm x 780mm |
Measuring Stage
|
Measuring range (X,Y) |
200mm x 150mm |
200mm x 150mm CNC |
|
Measuring range (Z) |
195mm (244mm max.)* |
195mm (244mm max.)* |
|
Measurement accuracy |
U952D = 2+(4.5L/1000)µm• |
U952D = 2+(4.5L/1000)µm |
|
Stage repeatability (X) (Y) (Z) |
0.002mm, 0.002mm, 0.004mm** |
0.002mm, 0.002mm, 0.004mm** |
|
Encoder resolution (X) (Y) (Z) |
0.0005mm, 0.0005mm, 0.0005mm |
0.0005mm, 0.0005mm, 0.0005mm |
Automation
|
Stage Movement |
Manual |
Motorised |
Illumintion Options
|
Surface Illumination |
Bright white, controllable and programmable quadrant LED ringlight. |
|
Episcopic Illumination |
Controllable and programmable LED Episcopic illumination. Projects light through the lens (TTL). Micro objectives require Episcopic illumination. |
|
Substage Illumination |
Controllable and programmable LED substage illumination. Includes iris adjustment to provide clearly defined edges. |
Dimensions
|
W x D x H |
750mm x 700mm x 780mm |
Measuring Stage
|
Measuring Range (X,Y) |
300mm x 225mm |
|
Measuring Range (Z) |
89mm max* |
|
Measurement Accuracy |
U952D = 15+(6.5L/1000)µm |
|
Stage Repeatability (X, Y, Z) |
0.010mm, 0.010mm, 0.010mm* |
|
Encoder Resolution (X, Y, Z) |
0.001mm, 0.001mm, 0.001mm |
Automation
|
Stage Movement |
Manual |
Illumination Options
|
Surface Illimination |
Bright white, LED ringlight |
|
Episcopic Illimination |
Episcopic illumination. Projects light through the lens (TTL). Micro objectives require Episcopic illumination. |
|
Substage Illumination |
Substage illumination. Includes iris adjustment to provide clearly defined edges. |
Dimensions
|
W x D x H |
1100mm x 980mm x 700mm |
Measuring Stage
|
Measuring Range (X,Y) |
400mm x 300mm |
|
Measuring Range (Z) |
89mm max.* |
|
Measurement accuracy |
U952D = 15+(8.5L/1000)µm |
|
Stage repeatability (X) (Y) (Z) |
0.010mm, 0.010mm, 0.010mm** |
|
Encoder resolution (X (Y) (Z) |
0.001mm, 0.001mm, 0.001mm |
Automation
|
Stage movement |
Manual |
Illumination Options
|
Surface Illumination |
Bright White LED ringlight |
|
Episcopic Illumination |
Episcopic Illumination. projects light through the lens (TTL). Micro objectives require Episcopic illumination. |
|
Substage Illumination |
Substage illumination. Includes iris adjustment to provide clearly defined edges. |
Dimensions
|
W x D x H |
1200mm x 1020mm x 700mm |
* Configuration dependant
** Based on using 10x macro lens (100x system magnification)
Where L = measured length in mm (200x system magnification, using controlled conditions)
Measuring stage calibration All measuring stages complete with factory-set Non-Linear Error Correction (NLEC) calibration as standard.
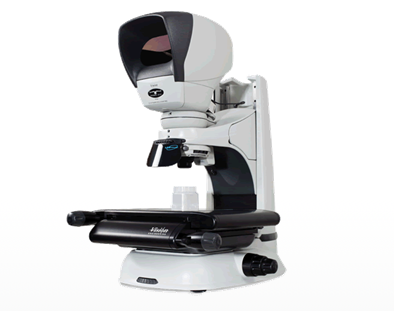
HAWK DUO When ultimate quality and flexibility is required. Hawk Duo combines both optical and video measuring technologies in the single system, so whatever component you are measuring, you have the best tools for the job. By integrating an ergonomic measuring microscope with a video measuring system, Vision Engineering has created Hawk Duo. Hawk Duo has the power and flexibility to measure both routine and difficult-to-view components, so whatever component you are measuring, you can be sure you have the best tools for the job. Hawk Duo offers high accuracy, repeatable measurement of complex components of all materials and excels at measuring both routine and difficult to view components, such as black or transparent plastics - all in one system.

Features
3-axis optical and video measurements
Patented microscope-resolution viewing head clearly defines edges, even for difficult-to-view samples
Integrated high resolution video measuring system, ideal for routine measurements
High precision measuring stage options
Powerful and intuitive PC-based software
Wide range of system configurations and options, including fully automated CNC control link.
Optics Patented twin pupil monoscopic Dynascope™ infinity corrected optical system, with pre-centred crossline graticlue to both eyes
Video High resolution colour CCD video camera
Magnification Options (System Total) Choice of both macro and micro objectives. Single macro objectives include an iris to adjust depth of field. Micro objectives housed in a 4 turret array.
Macro Objective Lenses
|
Objective lens |
Total magnification |
Working distance |
Field of View (mm Ø) |
Depth of Field |
|
1x |
10x |
84mm |
14.2mm |
270µm |
|
2x |
20x |
81mm |
7.1mm |
67µm |
|
5x |
50x |
61mm |
2.8mm |
10µm |
|
10x |
100x |
32mm |
1.4mm |
6µm |
Micro Objective Lenses (Standard Working Distance)
|
Objective lens |
Total magnifitaction |
Working distance |
Field of View (mm Ø) |
Depth of Field |
|
5x |
50x |
20mm |
4.4mm |
12.22µm |
|
10x |
100x |
10.1mm |
2.2mm |
3.06µm |
|
20x |
200x |
3.1mm |
1.1mm |
1.3µm |
|
50x |
500x |
0.66mm |
0.44mm |
0.43µm |
Micro Objective Lenses (Long Working Distance)
|
Objective lens |
Total magnification |
Working distance |
Field of view (mm Ø) |
Depth of Field |
|
10x |
100x |
21mm |
2.2mm |
4.4µm |
|
20x |
200x |
12mm |
1.1mm |
1.72µm |
|
50x |
500x |
10.6mm |
0.44mm |
1.10µm |
|
100x |
1000x |
3.4mm |
0.22mm |
0.43µm |
Micro Objective Lenses (Super Long Working Distance)
|
Objective lens |
Total magnification |
Working distance |
Field of view (mm Ø) |
Depth of Field |
|
20x |
200x |
21mm |
1.1mm |
2.24µm |
Software M3 metrology software IK5300 metrology software
Accessories Substage colour filter (to enhance the definition of profiled or turned parts)
Measuring Stage
|
Measuring Range (X,Y) |
150mm x 150mm |
|
Measuring range (Z) |
195mm (244mm max.)* |
|
Measurement accuracy |
U952D = 4+(5.5L/1000)µm |
|
Stage repeatability (X) (Y) (Z) |
0.004mm 0.004mm 0.004mm** |
|
Encoder repeatability (X) (Y) (Z) |
0.001mm 0.001mm 0.0005mm |
Automation
|
Stage movement |
Mannual |
Illumination options
|
Surface Illumination |
Bright white, controllable and programmable quadrant LED ringlight. |
|
Episcopic illumination |
Controllable and programmable LED Episcopic illumination. Projects light through the lens (TTL). Micro objectives require Episcopic illumination. |
|
Substage illumination |
Controllable and programmable LED substage illumination. Includes iris adjustment to provide clearly defined edges. |
Dimensions
|
W x D x H |
540mm x 700mm x 780mm |
Measuring Stage
|
Measuring range (X,Y) |
200mm x 150mm |
200mm x 150mm CNC |
|
Measuring range (Z) |
195mm (244mm max.)* |
195mm (244mm max.)* |
|
Measurement accuracy |
U952D = 2+(4.5L/1000)µm |
U952D = 2+(4.5L/1000)µm |
|
Stage repeatability (X) (Y) (Z) |
0.002mm 0.002mm 0.004mm** |
0.002mm 0.002mm 0.004mm** |
|
Encoder resolution (X) (Y) (Z) |
0.0005mm 0.0005mm 0.0005mm |
0.0005mm 0.0005mm 0.0005mm |
Automation
|
Stage Movement |
Manual |
CNC automted |
Illumination options
|
Surface illumination |
Bright white, controllable and programmable quadrant LED ringlight |
|
Episcopic illumination |
Controllable and programmable LED episcopic illumination. Projects light through the lens (TTL). Micro objectives require Episcopic illumination. |
|
Substage illumination |
Controllable and programmable LED substage illumination. Includes iris adjustment to provide clearly defined edges. |
Dimensions
|
W x D x H |
750mm x 700mm 780mm |
Measuring Stage
|
Measuring range (X,Y) |
300mm x 225mm |
|
Measuring range (Z) |
89mm max* |
|
Measurement accuracy |
U952D = 15+(6.5L/1000)µm |
|
Stage repeatability (X) (Y) (Z) |
0.010mm 0.010mm 0.010mm** |
|
Encoder resolution (X) (Y) (Z) |
0.001mm 0.001mm 0.001mm |
Automation
|
Stage movement |
Manual |
Illumination options
|
Surface illumination |
Bright white, LED ringlight |
|
Episcopic illumination |
Episcopic illumination. Projects light through the lens (TTL). Micro objectives require Episcopic illumination |
|
substage illumination |
Substage illumination. Includes iris adjustment to provide clearly defined edges. |
Dimensions
|
W x D x H |
1100mm x 980mm x 700mm |
Measuring Stage
|
Measuring range (X,Y) |
400mm x 300mm |
|
Measuring range (Z) |
89mm max.* |
|
Measurement accuracy |
U952D = 15+(8.5L/1000)µm |
|
Stage repeatability (X) (Y) (Z) |
0.010mm 0.010mm 0.010mm** |
|
Encoder resolution (X) (Y) (Z) |
0.001mm 0.001mm 0.001mm |
Automation
|
Stage movement |
Manual |
Illumination Options
|
Surface illumination |
Bright white, LED ringlight |
|
Episcopic illumination |
Episcopic illumination. Projects light through the lens (TTL). Micro objectives require Episcopic illumination |
|
Substage illumination |
Substage illumination. Includes iris adjustment to provides clearly defined edges. |
Dimensions
|
W x D x H |
1200mm x 1020mm x 700mm |
*Configuration dependant
**Based on using 10x macro lens (100x system magnification)
Where L = measured length in mm (200x system magnification using controlled conditions).
Measuring Stage Calibration All measuring stages complete with factory-set Non-Linear Error Correction (NLEC) calibration as standard
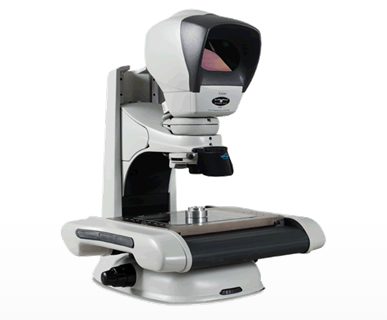
HAWK DUO CNC Hawk Duo CNC provides ultimate control, quality and flexibility for accuracte measurement of precision components, combining both optical and video measuring technologies in a fully automated CNC controlled system. By integrating an ergonomic measuring microscope with a fully automated video measuring system, Vision Engineering has created Hawk Duo CNC. Hawk Duo CNC offers high accuracy, repeatable measurement of complex components of all materials and excels at measuring both routine and difficult-to-view components, such as black or transparent plastics - all in one system. Hawk Duo CNC is designed for companies who demand the highest levels of manufacturing quality, with the power and flexibility to meet the most demanding measurement requirements.

Features
Fully automated 3-axis optical and video measurements
Patented microscope-resolution viewing head clearly defines edges, even for difficult-to-view samples
Integrated high resolution video measuring system, ideal for routine measurements
High precision measuring stage
Powerful and intuitive PC-based software
Range of system configurations and options
Optics Patented twin pupil monoscopic Dynascope™ infinity corrected optical system, with pre-centred crossline graticule to both eyes.
Video High resolution colour CCD video camera
Magnification Options (System Total) Choice of both macro and micro objectives. Single macro objectives include an iris to adjust depth of field. Micro objectives housed in a 4-turret array.
Macro Objectives Lenses
|
Objective Lens |
Total magnification |
Working distance |
Field of view (mm Ø) |
Depth of Field |
|
1x |
10x |
84mm |
14.2mm |
270µm |
|
2x |
20x |
81mm |
7.1mm |
67µm |
|
5x |
50x |
61mm |
2.8mm |
10µm |
|
10x |
100x |
32mm |
1.4mm |
6µm |
Micro Objective Lens (Standard Working Distance)
|
Objective lens |
Total magnification |
Working Distance |
Field of view (mm Ø) |
Depth of Field |
|
5x |
50x |
20mm |
4.4mm |
12.22µm |
|
10x |
100x |
10.1mm |
2.2mm |
3.06µm |
|
20x |
200x |
3.1mm |
1.1mm |
1.3µm |
|
50x |
500x |
0.66mm |
0.44mm |
0.43µm |
Micro Objective Lenses (Long Working Distance)
|
Objective lens |
Total magnification |
Working Distance |
Field of view (mm Ø) |
Depth of Field |
|
10x |
100x |
21mm |
2.2mm |
4.4µm |
|
20x |
200x |
12mm |
1.1mm |
1.72µm |
|
50x |
500x |
10.6mm |
0.44mm |
1.10µm |
|
100x |
1000x |
3.4mm |
0.22mm |
0.43µm |
Micro Objective Lenses (Super Long Working Distance)
|
Objective lens |
Total magnification |
Working Distance |
Field of view (mm Ø) |
Depth of Field |
|
20x |
200x |
21mm |
1.1mm |
2.24µm |
|
50x |
500x |
15mm |
0.44mm |
1.36µm |
Software M3 metrology software IK 5300 metrology software
Accessories Substage colour filter (to enhance definintion of profiled or turned parts)
Measuring Stage
|
Measuring range (X,Y) |
200mm x 150mm |
|
Measuring range (Z) |
202mm (244mm max.)* |
|
Measurement accuracy |
U952D = 2+(4.5L/1000)µm |
|
Stage repeatability (X) (Y) (Z) |
0.002mm 0.002mm 0.004mm** |
|
Encoder repeatability (X) (Y) (Z) |
0.0005mm 0.0005mm 0.0005mm |
Automation
|
Stage movement |
CNC automated |
Illumination Options
|
Surface illumination |
Bright white, controllable and programmable quadrant LED ringlight |
|
Episcopic illumination |
Controllable and programmable LED Episcopic illumination. Projects light through the lens (TTL). Micro objectives require Episcopic illumination. |
|
Substage illumination |
Controllable and programmable LED substage illumination. Includes iris adjustment to provide clearly defined edges. |
Dimensions
|
W x D x H |
750mm x 700mm x 780mm |
*Configuration dependant
**Based on using 10x micro lens (100x system magnification)
Where L = measured length in mm (200x system magnification, using controlled conditions).


